A members-only part of your site can be a versatile way of targeting specific content for specific customers. This is done through restricting content access. On your Shopify store, you can sell content access to paying customers or a subset of your store’s visitors.
As a Shopify merchant, you can use apps to quickly set up and create members-only areas or use code that requires customers to log in to access your store.
Why sell content access
Content access allows you to manage what part of your store can be viewed based on your audience. You can allow access to parts of your store to customers for simply signing up or creating an account, or for also making a purchase.
Restricted or members-only areas can allow you to cater to a specific audience. This is essential if you are selling digital products on your store. Or, even to create a community by providing value-added content to paying customers. This can include tutorials, event notifications, digital copies of physical products, etc. You can restrict access to your blog to only show posts to customers who have made purchases.
There are a number of things you can include on parts of your store with restricted content access:
- premium content that requires a purchase
- forums through apps like Muut
- member updates and notifications through blog posts
- exclusive offers and discounts for certain customers
All this adds to the experience a customer has with your brand and your store. Restricted content lets your customers know that they are getting something extra that is not otherwise available to the public. Depending on what content you give access to, this can help build customer loyalty as customers have a reason to come back to your store.
Content access through Apps
The easiest “no-code” way to restrict content on your store and create members-only areas is through apps like Locksmith. Locksmith allows you to restrict customer access to any part of your store, including pages, blog, products, cart, or even the entire store.
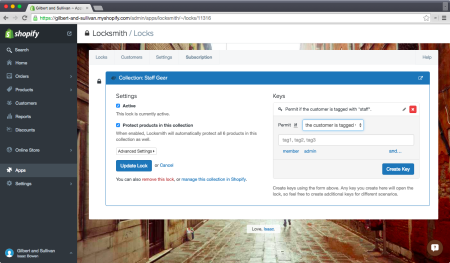
You can create a “lock” on whichever part of your store you want to restrict. Then you can assign a specific “key” that opens this lock.
Locksmith has a number of default key options that don’t need any customization. Some keys are:
- customer tags
- specific product purchases
- purchase amount
- day of the week
- zip codes
A popular key is customer tags which can be used to open a specific part of the store for specific identified customers. You can add tags to customers by clicking on a customer’s name through the Customers section in your Shopify admin. Then scroll to Organization to add tags.

Locksmith lock and key setting (Source)
Other than restricting access to pages with premium content or additional digital products, Locksmith can be used to hide content that a visitor does not have access to (including from the navigation bar), and limit how quickly a customer can re-order.
You can also modify Supple Membership, a membership management app, to enable Membership Subscriptions. Read their tutorial on how to enable it using the ReCharge: Recurring Billing, Payments and Subscriptions app.
Content access through code
If you are comfortable using and manipulating HTML, CSS and JavaScript, you can also use code to enable a members-only page. You can do this by requiring account creation for check out, and modifying the page template file.
Required Account Creation
In order to require all customers to make an account:
- Through Shopify admin dashboard, go to Settings.
- Click Checkout and go to Customer Accounts.
- Select ‘Accounts are required’ and Save Changes.
Template file
Modify the Liquid theme file to create a log in page and redirect customers who log in to your store. In order to enable this:
- Go to the Edit HTML/CSS page.
- Within Layouts, click on the
theme.liquidfile. - Add the below code at the top of the file and Save Changes:
{% unless customer %}

{% if template contains 'customers' %}

    {% assign send_to_login = false %}

{% else %}

    {% assign send_to_login = true %}

{% endif %}

{% endunless %}
{% if send_to_login %}

<meta content="0; url=/account/login?checkout_url={{ shop.url }}" http-equiv="refresh" />

{% else %}

... Other theme.liquid contents should be left alone here ...

{% endif %}
You can manipulate the above code to customize where users are redirected. If you are not familiar with Liquid (Shopify’s template language), here are some Liquid basics.
Takeaway
You can restrict access to certain parts of your Shopify store in order to add extra value to customers making purchases of your physical products, or to sell digital products like videos, music, books, or even information through your blog.
Create a members-only area with free add-ons to incentivize customers and build a better customer experience. These pages can be used to specifically target a subset of your customers in order to personalize their experience on your store.
There are a number of ways to enable members-only pages on your store, and the easiest way is through apps like Locksmith.
Are you using members-only areas on your store? Tell us what you are using them for in the comments below.
Jai Sangha
Latest posts by Jai Sangha (see all)
- Add Trust Badges to Your Shopify Store [2019 Edition] - June 20, 2019
- 3 Tips to Improve Your Shopify Store SEO - March 23, 2017
- March App of the Month: Show Instagram Feed on Shopify - March 15, 2017


Nice post Jai.
I made a video to explain exactly this: https://youtu.be/IaZNE2HP6Es
I hope you like it.
Tx
Awesome, thanks for the heads up Robert :)
Locksmith can now also protect content with passcodes and secret links! :D Easier than ever to share access to private areas of your store.
Hey Isaac, thanks so much for the update! Passcodes and secret links sound great — we’ll be sure to check this out :D